
Camera Settings for a Sharp Video Podcast

For a sharp video podcast, start with 1080p at 30fps, a 1/60 shutter, f/2.8 for a single host (f/5.6 for two), ISO as low as your light allows but capped at 1600, and white balance locked to a number (around 5600K for daylight). Set them in manual mode once, then leave them alone for the whole episode. The exact values are below, but the rule under all of them is the same: pick a setting and stop letting the camera change it on you.
That last part is what separates a recording that looks produced from one that looks like a webcam call. Auto modes re-decide your exposure, focus, and color every few seconds. The result is footage that pulses brighter and darker, hunts for focus when someone leans back, and shifts color when a cloud passes the window. None of it is dramatic in any single frame. All of it is obvious across a 40-minute episode, and worse, it makes your clips inconsistent, clip three looks warmer than clip seven, and you can't fix that in bulk later.
The camera settings cheat sheet (copy these)
Here is the whole thing in one card. Read the reasoning sections below before you change any of it, but if you just want numbers to dial in tonight, these are the numbers.
What frame rate should you shoot a video podcast at?
Shoot at 30fps for a video podcast. It matches what phones capture and what TikTok, Reels, and Shorts expect, so your clips drop straight in without conversion artifacts or judder. People who watch their podcasts skew toward video, 53% of new US weekly listeners now prefer to watch one over just listening, up from 30% in April 2022 (Backlinko, citing Cumulus Media). You are making a video product, so match the video standard. (If that pushes you toward two angles, see single vs. multi-camera.)
Use 24fps only if you specifically want a slightly more cinematic feel and you are comfortable with the matching 1/50 shutter. Skip 60fps for a talking-head show, it doubles your file size and storage for footage where nobody is moving fast, and the smoother look reads as "live stream," not "produced episode." The one case for 60fps is if you plan slow-motion B-roll, which most podcasts never use.
The 180-degree shutter rule: why 1/60 and not 1/1000
Set your shutter speed to roughly double your frame rate: 1/60 at 30fps, 1/50 at 24fps. This is the 180-degree shutter rule, borrowed from film, and it produces the small amount of motion blur the eye reads as natural (B&H Photo; RED's shutter-angle guide). When someone gestures or turns their head, the motion looks smooth instead of stuttery.
Crank the shutter to 1/500 or higher and every gesture gets a crisp, choppy, slightly robotic edge, the look of security-camera footage. The mistake usually happens by accident: a bright window pushes your exposure, the camera compensates with a fast shutter in auto mode, and your motion goes weird. Lock the shutter at 1/60 and control brightness with light and ISO instead.
Aperture: f/2.8 for one person, f/5.6 for two
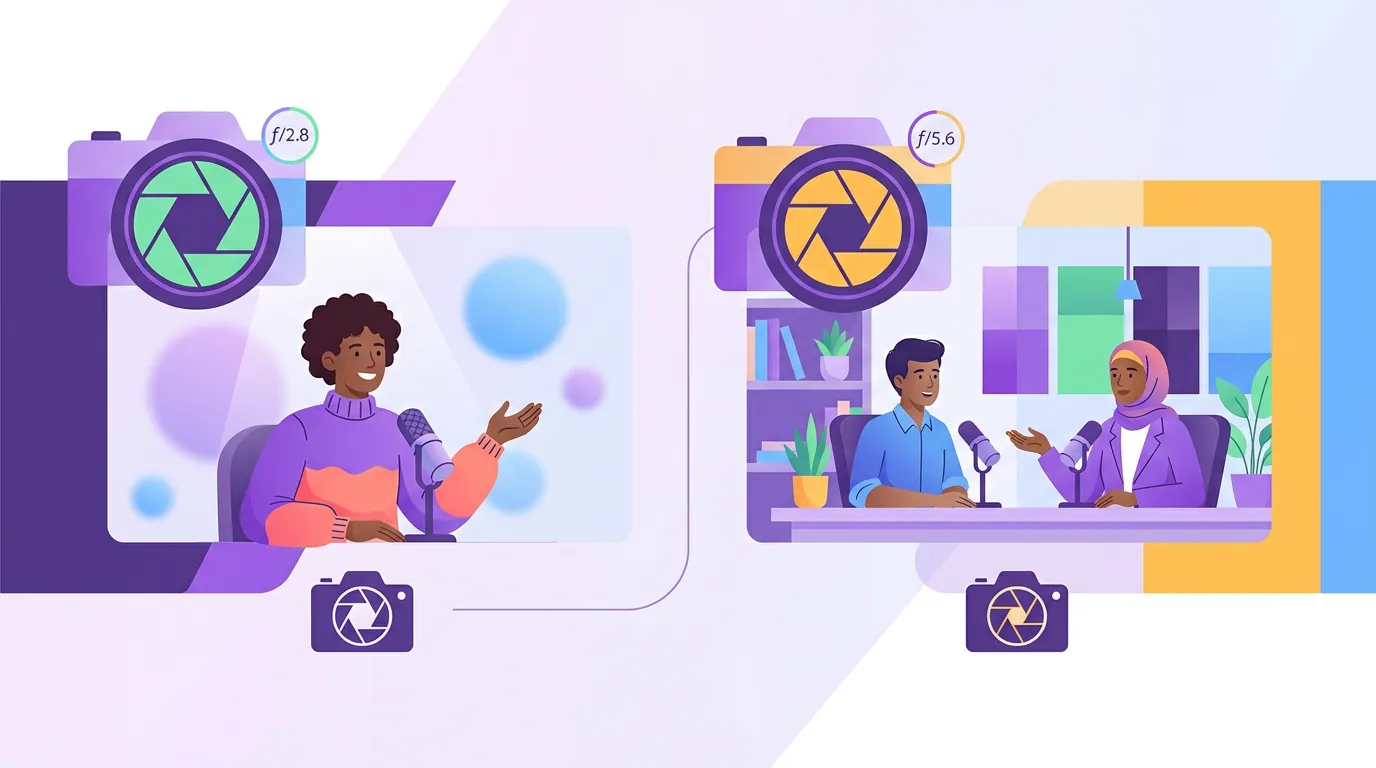
Aperture sets how much of the scene is in focus, and it is the one setting that depends on how many people are at the desk. For a single host, f/2.8 gives a soft, separated background while keeping your face sharp, the look people associate with a "real" camera versus a webcam. For two people seated side by side at slightly different distances from the lens, open it up to f/5.6 so the focus plane is deep enough to hold both faces sharp.
The trap with f/2.8 and two people is that one of you is always slightly soft, and the camera's autofocus keeps switching between you mid-conversation, which is distracting to watch. Closing down to f/5.6 fixes it. The cost is that f/5.6 lets in less light, so you may need more lamps or a higher ISO, which is exactly why these settings interact and why you set them together. If your background still looks busy at f/5.6, the fix is moving the desk farther from the wall, not opening the aperture back up. The same logic shows up when you plan your shot framing and composition.
ISO: as low as you can, capped before it gets grainy
Keep ISO as low as your lighting allows, and treat 1600 as your ceiling on most consumer cameras. ISO is the amplifier: it brightens the image, but it also amplifies noise, so high ISO gives you a grainy, mushy picture that looks worse after a clip gets compressed for social. Start at 100, then raise ISO only after you have already added light and you cannot get more.
The honest order of operations is: add light first, open aperture second (within your focus limits), raise ISO last. Most "my podcast footage looks cheap" problems are actually underexposed footage shot in a dim room, not a bad camera. A better-lit room at ISO 400 beats a dark room at ISO 6400 every time. That is the whole argument for sorting out your lighting for a video podcast before you spend more on the camera body.
White balance: lock it to a number, never auto
Set white balance to a fixed Kelvin value, around 5600K for daylight or a daylight-balanced LED, around 3200K for warm tungsten lamps, and lock it. Auto white balance re-guesses the color temperature every time the light shifts, so your skin tone drifts cooler and warmer through the episode. Across a full recording that looks like a color glitch; across a batch of clips it means clip three and clip eight don't match, and there is no clean way to fix that afterward.
The simplest reliable method: set every light in the room to the same color temperature, point a sheet of white paper at the camera, use your camera's custom white balance to read off it, then lock that value. Now your color is consistent for the whole session and the next one, as long as your lights don't change. This is the single biggest reason to record video podcasts under controlled lights instead of a window, sunlight changes color all day, and your locked white balance can't follow it.
Why "auto everything" wrecks consistency between takes
Auto modes optimize each frame in isolation; a podcast needs the whole episode to match. That is the core conflict. Autoexposure chases the brightest thing in frame, so leaning back from a bright window dims your face. Autofocus hunts when you gesture or a second person leans in. Auto white balance shifts color as the light changes. None of it ruins one frame, all of it ruins a 40-minute take and the clips you cut from it.
This matters more than it used to because the clip is the product, not the trailer for it. 42% of podcast listeners discover new shows through social channels like Instagram, TikTok, and Facebook (Castmagic, citing Spotify), which means your clips, not your full episodes, are where most new viewers meet you. A viewer scrolling past makes a watch-or-skip decision in the first couple of seconds. Footage that pulses in brightness or hunts for focus reads as "skip" before the words even register. Manual settings, locked once, are how you make every clip look like it came from the same produced show, because it did.
FAQ
Do these settings work for a webcam or are they only for a real camera? They are written for a mirrorless or DSLR camera with manual control. A basic webcam may not expose shutter, aperture, or white balance at all. If you are on a webcam, the high-value moves are still locking exposure and white balance in your capture software if it allows it, and adding light. See our guide to the best webcams for podcasting for models that give you manual control.
What if my room is too dark for ISO 1600 at f/5.6? Add light before you do anything else. Lower the shutter no further than 1/60 (going below that for a podcast risks motion blur on gestures), then accept f/2.8 if you only have one person. If you have two people and a dark room, more light is the only real fix; pushing ISO past 1600 trades a focus problem for a noise problem.
Should I use my camera's auto-focus at all? Yes, to acquire focus on your face once, then lock it. Modern eye-detection autofocus is good for finding you. The problem is continuous autofocus drifting and hunting during the episode, so set it, lock it, and only refocus if you change seats.
Is 4K worth it for a video podcast? Usually not for a talking-head show. 1080p is plenty of resolution for clips and full episodes, and 4K multiplies your file sizes and editing load for footage where nobody moves. Shoot 4K only if you want the option to crop in for a fake second camera angle in post.
Setting up your first video podcast from scratch? Start with filming a video podcast for the first time, then decide whether you need a single or multi-camera setup.